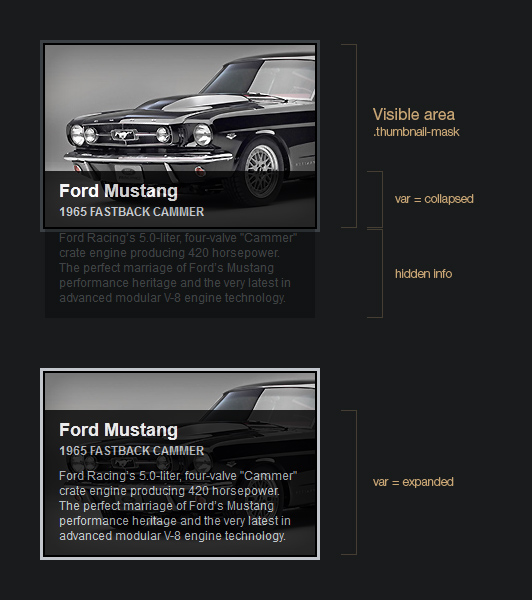
Here’s a nifty way of adding some interaction to your post thumbnails. It also helps to clean up a magazine style design where you have lots of post thumbnails with titles and descriptions. If you want to use this inside a WordPress loop there’s some tips on how to do that here too.
Demo: Plenty of examples on my Work page.
Source files: jquery_imagecaption.zip
Javascript enabled

Javascript disabled
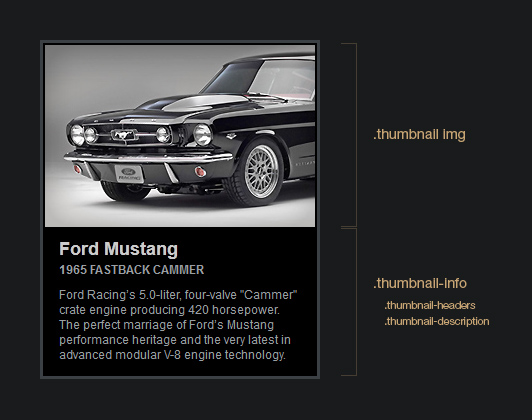
Without any javascript in place, we see that the thumbnail-info div sits nicely under the image. That’s a tick in the Progressive Enhancement box.

HTML
This is just the plain HTML, and it’s assuming you’re already using H1 and H2 in your page. See the example in the Source files to see how it works along with the CSS and jQuery.
1 2 3 4 5 6 7 8 9 10 11 12 13 14 | <div class="thumbnail"> <a href="http://www.webdale.co.uk"> <div class="thumbnail-mask"> <!-- Our masking div that we will use if Javascript is enabled --> <img src="mustang.jpg" alt=""> <div class="thumbnail-info"> <!-- This div is what we want to move up and down --> <div class="thumbnail-headers"> <h3 class="thumbnail-title">Ford Mustang</h3> <h4 class="thumbnail-subtitle">1965 Fastback Cammer</h4> </div> <p class="thumbnail-description">Ford Racing’s 5.0-liter, four-valve "Cammer" crate engine producing 420 horsepower. The perfect marriage of Ford’s Mustang performance heritage and the very latest in advanced modular V-8 engine technology.</p> </div> </div> </a> </div> |
You’ll also need to include the jQuery library into your page of course, and jQuery UI if you want to animate the color of the borders. For WordPress I generally put this in footer.php just above the /body closing tag.
1 2 3 4 5 6 7 8 | <!-- Load jQuerey from google. We also need jQuerey UI to animate color --> <script type="text/javascript" src="http://www.google.com/jsapi"></script> <script type="text/javascript"> google.load("jquery", "1"); google.load("jqueryui", "1"); </script> <!-- Load our local script --> <script type='text/javascript' src="script.js"></script> |
CSS
1 2 3 4 5 6 7 | .thumbnail { width:274px; border:3px solid #3b4045; background:black; margin:0 auto; } .thumbnail img { border:2px solid black; vertical-align:top;} .thumbnail-info { background:black; text-align:left; padding: 0 16px 8px 16px; opacity:0.8; -moz-opacity: 0.8; opacity:.80; filter:alpha(opacity=80); } .thumbnail-headers { padding: 8px 0 10px 0; } h3.thumbnail-title { font-size:18px; padding-bottom: 3px; color:white; } h4.thumbnail-subtitle { color:#c2c6cc; text-transform:uppercase; } p.thumbnail-description { margin-bottom: 0.5em; color:#c2c6cc; } |
jQuery
This is where all our enhancing takes place. The code makes a mask using the size of the image as a reference, then hides the info panel inside it, and moves it up and down when hovered over. The border colour changes for a nice interactive touch.
1 2 3 4 5 6 7 8 9 10 11 12 13 14 15 16 17 18 19 20 21 22 23 24 25 26 27 28 29 30 31 32 33 34 35 36 37 38 39 40 41 42 43 44 45 46 47 48 | $(document).ready(function() { //Get the height of our image including the black border var thumbnailImgHeight = $(".thumbnail-mask img").outerHeight(); //Set our mask to that height, and set Overflow to Hidden to create the mask $(".thumbnail-mask").height(thumbnailImgHeight); $(".thumbnail-mask").css("overflow","hidden"); //Get the ammount of negative margin for both hover states var collapsed = -($(".thumbnail-headers").outerHeight()); var expanded = -($(".thumbnail-info").outerHeight()); //Our border colors var onBorderColor = "#C2C6CC"; var offBorderColor = $(".thumbnail").css("border-left-color"); //Set the default state to collapsed $(".thumbnail-info").css("marginTop", collapsed) $(".thumbnail a").hover( //Mouse enter function () { $(".thumbnail-info").stop().animate({ marginTop: expanded }, 200); $(this).parent().stop().animate({ borderTopColor: onBorderColor, borderRightColor: onBorderColor, borderBottomColor: onBorderColor, borderLeftColor: onBorderColor }, 250); }, //Mouse leave function () { $(".thumbnail-info").stop().animate({ marginTop: collapsed }, 200); $(this).parent().stop().animate({ borderTopColor: offBorderColor, borderRightColor: offBorderColor, borderBottomColor: offBorderColor, borderLeftColor: offBorderColor }, 250); } ); }); |
WordPress loop
Putting this into a WordPress loop is no problem, though you will want to float and space each thumbnail to suit your custom theme, and have them arranged in an un-ordered list rather than straight div’s. In the example below you’ll need to have two custom fields set up for each post: post_subtitle and post_description. You could also use this code within a Custom Post Type loop as I have for my portfolio, you’ll just need to change the hooks and the query method (I won’t go into that as it’s a little more advanced. See this article for more info on Custom Post Types).
1 2 3 4 5 6 7 8 9 10 11 12 13 14 15 16 17 18 19 20 21 22 23 | <ul id="post-thumbnails"> <?php $post_query = new WP_Query(); //Number of posts you want to show $post_query->query('showposts=6'.'&paged='.$paged); while ($post_query->have_posts()) : $post_query->the_post();?> <li class="thumbnail"> <a href="<?php the_permalink() ?>"> <div class="thumbnail-mask"> <!-- Our masking div that we will use if Javascript is enabled --> <?php the_post_thumbnail(); ?> <div class="thumbnail-info"> <!-- This div is what we want to move up and down --> <div class="thumbnail-headers"> <h3 class="thumbnail-title"><?php the_title(); ?></h3> <h4 class="thumbnail-subtitle"><?php echo get_post_meta($post->ID, 'post_subtitle', true);?></h4> </div> <p class="thumbnail-description"><?php echo get_post_meta($post->ID, 'post_description', true);?></p> </div> </div> </a> </li> <?php endwhile; ?> </ul> |
Enjoy your much simpler and much more interactive page!